Limestone Patio Slabs: Expert DIY Installation Advice for Homeowners
Table of Contents
- Key Takeaways
- Planning Your Dream Limestone Patio
- Preparation: Setting the Stage for Success
- Finishing Touches: Bringing Your Patio to Life
- Aftercare: Protecting Your Investment
- Frequently Asked Questions (FAQ)
Key Takeaways
- Limestone is a durable and aesthetically pleasing choice for patio installation.
- Preparation is key: Clear the area and create a solid foundation for your limestone slabs.
- Follow a step-by-step process to lay and secure the limestone properly.
- Seal your limestone patio to protect it and extend its lifespan.
- Regular maintenance will keep your patio looking great for years to come.

Benefits of Choosing Limestone
Before we get our hands dirty, let's talk about why limestone is such a fantastic choice for your patio. Limestone slabs are known for their natural beauty, with each piece offering unique textures and colours. This stone is also incredibly durable, and able to withstand various weather conditions, which is crucial for any outdoor application. Moreover, limestone's natural coolness makes it comfortable to walk on during hot days.
- Stunning natural beauty with unique textures and colours.
- Excellent durability and weather resistance.
- Natural coolness provides comfort in hot weather.
What You'll Need to Get Started
Before jumping into the installation, you'll need to gather a few essential tools and materials. These will ensure that you have everything at hand to make the process smooth and efficient.
- Measuring tape to determine the patio size.
- Landscape marking paint to outline the area.
- Shovel and rake for excavation and levelling.
- Tamper or plate compactor for a firm foundation.
- Limestone slabs of your chosen colour and texture.
- Sand and gravel for the base and jointing.
- Level to ensure even slab placement.
- Rubber mallet for positioning the stones.
- Mortar or adhesive, if needed for your project.
- Sealant to protect the limestone post-installation.
With these tools in tow, you're ready to embark on creating a beautiful limestone patio that you'll enjoy for years to come.
Planning Your Dream Limestone Patio
Gathering the Right Materials
Choosing the right limestone slabs is the first step in your patio project. Consider the colour and finish that will best complement your home and garden. You'll also need to calculate the number of slabs required based on the area of your patio. It's a good idea to order a little extra to account for cuts and breakage.
Designing Your Layout
Once you have your materials, it's time to design your patio layout. Think about the shape and pattern you want for your patio. Do you prefer a random layout or a more structured design? Sketching out a few ideas can help you visualize the result and ensure that you're happy with your plan before you start laying the slabs.
Preparation: Setting the Stage for Success
Measuring and Clearing Your Space
The first physical step in your patio project is to measure and clear the area where you'll lay the limestone. Use your measuring tape and landscape marking paint to define the exact dimensions of your future patio. Then, it's time to roll up your sleeves and remove any grass, weeds, or debris. You want to start with a clean slate to create a stable base for your slabs.
Creating a Solid Foundation
A solid foundation is crucial for the longevity of your patio. Begin by digging to the recommended depth—usually around 6 to 8 inches—keeping in mind that you'll need to accommodate the height of your limestone slabs plus the sand and gravel base. Once you've excavated the area, add a layer of gravel and compact it down using a tamper or plate compactor. This will help with drainage and prevent shifting. Next, add a layer of sand to create a smooth, level surface for your limestone to rest on.
Remember, a good foundation will prevent a lot of headaches down the line, so don't rush this step. Take your time to ensure everything is level and compacted properly. This meticulous preparation will pay off when you're enjoying a stable and beautiful limestone patio for years to come.
Laying the Limestone: A Step-by-Step Guide
Arranging Your Slabs
With your foundation set, it's time to lay the limestone slabs. Begin at one corner of the patio area and lay the first slab into place. Use a level to check that the slab is even, and gently tap it with a rubber mallet to make minor adjustments. It's important to keep checking the level as you go along to ensure a flat surface. Continue laying each slab, leaving a gap between them if you prefer a jointed look, or place them edge to edge for a seamless finish.
Securing the Stone
Once all your slabs are laid out, it's time to secure them in place. If you've chosen a dry lay method, sweep sand into the gaps between the slabs to lock them together. For a more permanent fix, you can use mortar or a specialized adhesive. Apply the adhesive according to the manufacturer's instructions and press the slabs firmly into place. This will prevent any unwanted movement and ensure the longevity of your patio.
Finishing Touches: Bringing Your Patio to Life
Your limestone patio is almost ready to enjoy. But first, let's add those finishing touches that will make it truly shine. If you've left gaps between your slabs, now is the time to fill them. You can use sand for a traditional look or opt for a polymeric sand that hardens and prevents weeds from sprouting up. Brush the sand into the gaps, ensuring they are filled, and then sweep away any excess.
Sealing for Longevity
To protect your limestone and keep it looking great, sealing is a must. A good quality sealant will prevent stains, reduce wear and tear, and make your patio easier to clean. Apply the sealant according to the manufacturer's instructions, usually with a roller or sprayer. Allow it to dry completely before walking on the patio. It's a simple step that will greatly extend the life of your limestone patio.
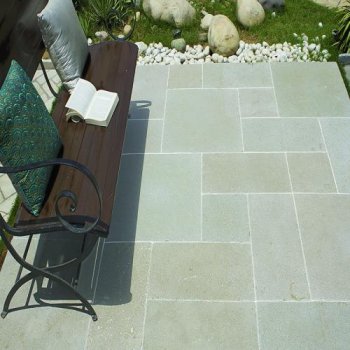
Decorating Your New Patio
Now that your limestone patio is complete, it's time to add your personal touch. Arrange outdoor furniture, planters, and lighting to create a welcoming space. Consider adding a fire pit for cosy evenings or a water feature for a calming ambience. The natural beauty of limestone provides a versatile backdrop for any style, from rustic to modern.
Aftercare: Protecting Your Investment
Routine Maintenance Tips
To keep your limestone patio in top condition, routine maintenance is key. Regular sweeping will prevent debris from scratching the surface, and occasional washing with a mild detergent will keep it looking fresh. Be sure to reapply the sealant every few years to maintain its protective layer. With proper care, your limestone patio will remain a beautiful and functional part of your home for many years.
Handling Weather Conditions and Stains
Limestone is resilient, but like all natural materials, it can be affected by harsh weather and stains. In case of spills, clean them up promptly to prevent staining. During winter, avoid using salt-based deicers as they can damage the stone. Instead, opt for sand or calcium-based products. If you live in an area with freeze-thaw cycles, make sure your patio has good drainage to prevent water from pooling and causing damage.
By following these detailed steps and tips, you'll be able to install a stunning limestone patio that will not only enhance the beauty of your outdoor space but also serve as a testament to your handiwork. So, roll up your sleeves and get ready to transform your backyard into a limestone oasis that's perfect for relaxing and entertaining.
With your limestone patio now fully installed and looking beautiful, it's time to focus on keeping it that way. Proper aftercare is essential for ensuring your patio remains a highlight of your outdoor space for many years to come.
Routine Maintenance Tips
Regular maintenance is simpler than you might think and goes a long way in preserving the look and integrity of your limestone patio. Here are some tips to keep your patio in pristine condition:
- Sweep your patio regularly to remove dirt and debris.
- Wash the limestone with a mild detergent and a soft brush to avoid scratching the surface.
- Reapply a high-quality sealant every two to three years to protect the limestone from stains and weathering.
Handling Weather Conditions and Stains
Limestone is tough, but it isn't immune to the elements or accidental spills. To tackle these challenges, here's what you can do:
- Clean up spills immediately to prevent staining.
- Avoid using salt-based deicers in winter; opt for safer alternatives like calcium chloride or clean sand.
- Ensure your patio has proper drainage to prevent water damage in freeze-thaw cycles.
Key Points
| Topics | Key Points |
|
Preparing the Base for Limestone Patio Slabs |
- Ensure a stable, level base by excavating and compacting the soil - Use a sub-base of crushed stone or concrete to provide a solid foundation |
|
Laying Limestone Patio Slabs |
- Start with a perimeter edge to contain the slabs and maintain alignment - Lay the slabs in a staggered pattern for better stability and appearance - Use a rubber mallet to gently tap the slabs into place and level them |
|
Spacing and Jointing |
- Leave a small gap (3-5mm) between each slab to allow for expansion - Fill the gaps with a suitable jointing compound or sand to lock the slabs in place |
|
Cutting and Shaping Limestone Slabs |
- Use a wet saw or angle grinder with a diamond blade to cut slabs to fit - Smooth the edges with a grinder or chisel to prevent chipping |
|
Sealing and Protecting Limestone Patios |
- Apply a penetrating sealer to protect the limestone from stains and weathering - Reapply the sealer every 1-2 years to maintain the patio's appearance and longevity |
|
Maintaining Limestone Patio Slabs |
- Regularly sweep and clean the patio to prevent buildup of dirt and debris - Address any cracks or chips promptly to prevent further damage - Use a pH-neutral cleaner and avoid harsh chemicals that can etch the stone |
|
Safety Considerations |
- Ensure the patio surface is non-slip by using textured or anti-slip treatments - Consider adding edging or borders to prevent tripping hazards |
Frequently Asked Questions (FAQ)
Can I install limestone over an existing concrete patio?
Yes, you can install limestone slabs over an existing concrete patio, provided that the concrete is in good condition without any major cracks or unevenness. This method can save you time and labour by using concrete as a base. Just ensure that the surface is clean and apply a suitable bonding agent before laying the limestone.
How often should I seal my limestone patio?
It's recommended to seal your limestone patio every two to three years, depending on the level of exposure to the elements and foot traffic. Sealing helps to protect the stone from stains and weather damage, keeping your patio looking its best.
What is the best way to clean limestone patio slabs?
To clean your limestone patio slabs, use a soft brush or broom and a mild detergent mixed with water. Avoid using acidic cleaners, as they can etch the surface of the limestone. Rinse the patio thoroughly with water after cleaning to remove any soap residue.
How do I prevent weeds from growing between my limestone slabs?
To prevent weeds from sprouting between your limestone slabs, make sure to fill the joints properly with sand or polymeric sand, which hardens and inhibits weed growth. Regular maintenance, such as sweeping and re-sanding the joints, can also help to keep weeds at bay.
Is limestone durable enough for high-traffic areas?
Limestone is a strong and durable natural stone, making it suitable for high-traffic areas. However, it's important to choose a higher-density limestone for these areas and ensure it's properly sealed to withstand the increased wear and tear.
Related Articles:
- Concrete Slab Base Preparation Guide for Longevity & Durability
- Sandstone Paving & Flower Beds Design: Landscape Garden Aesthetics Tips
- Quartzite Pathway Care: Quick & Simple Maintenance Tips
- Top Dark Slate Paving Benefits for Welsh Outdoor Oasis & Design Ideas
- Granite Paving Stain Removal Guide & Best Techniques
- Slate Slabs Durability Guide: Long-Lasting & Strong Selection Tips
- Limestone Patio Slabs: Expert DIY Installation Advice for Homeowners
- Limestone Paving Non-Slip Solutions: Safety Techniques & Tips
- Winter Care Tips for Durable Slate Paving Slabs
- Garden Patio Materials Showdown: Concrete or Granite?